How New Construction Homes Are Built in Austin
Understanding how new construction homes are built makes you a better buyer. You know what to ask at the sales office, you know when to schedule your inspections, and you know what it actually means when a builder says your home is “in framing” versus “at interior finishes.”
I am a real estate agent in Austin, TX at eXp Realty (TREC #811948), and I walk new construction sites with buyers regularly. Here is a plain-language breakdown of the entire process — from the lot acquisition through the finishing touches — with Austin-specific notes on why certain steps look different here than they do in other markets.
Step 1: Buy Land and Prepare the Lot
Before a single wall goes up, the builder has to own or control the land and get it ready to build on.
For a production builder in a master-planned community — Lennar in Pflugerville, Pulte in Leander, KB Home in Round Rock — the land acquisition happened years before you walked into the sales office. The builder purchased large tracts, divided them into homesites, and is now selling finished homes off a plat.
For a custom or semi-custom build, the buyer typically sources the lot separately and then hires a builder. That process adds complexity: title review, soil testing, utility availability confirmation, and in some Austin-area locations, water utility negotiations that can add months.
Once the lot is controlled, site prep begins: clearing trees and brush, rough grading to establish drainage flow, and utility trenching for water, sewer, and power runs. In newer Pflugerville, Leander, and Hutto master-plans, this infrastructure work has usually been done at the community level already — individual lots just need the final utility connections.
Austin-specific note: Many newer Austin-area communities are in Municipal Utility Districts (MUDs), which means water, sewer, and drainage are funded through a special tax district rather than the city. If your community is in a MUD, always ask the builder for the current MUD tax rate and the projected year-2 property tax total — the difference from year 1 (based on unimproved lot) to year 2 (finished home) can be 2–3 times higher.
Step 2: Foundation
The foundation is the most critical structural element of your home, and in Austin, it looks different than in most of the country.
Central Texas sits on expansive clay soil — soil that swells when saturated and shrinks during drought. In a normal wet-dry cycle, this movement would crack a conventional concrete slab. Austin builders have adapted by using post-tension slabs: concrete slabs reinforced with steel cables that are tensioned after the concrete cures. The cables hold the slab together and allow it to flex slightly with soil movement rather than crack.
The foundation process:
- The site is excavated and leveled
- A vapor barrier is laid over compacted fill
- Steel reinforcement (rebar) is placed in a grid pattern
- Post-tension cables are run through plastic sheeves throughout the slab
- Concrete is poured and allowed to cure (typically 7–10 days)
- The cables are tensioned with hydraulic equipment at the slab perimeter
- The slab is inspected by the city before framing can begin
If you are having a home built-to-order, the foundation phase is also when your builder confirms the lot survey and sets the home’s final footprint on the lot — which determines exactly where your home sits, how far setbacks are, and where the driveway will land.
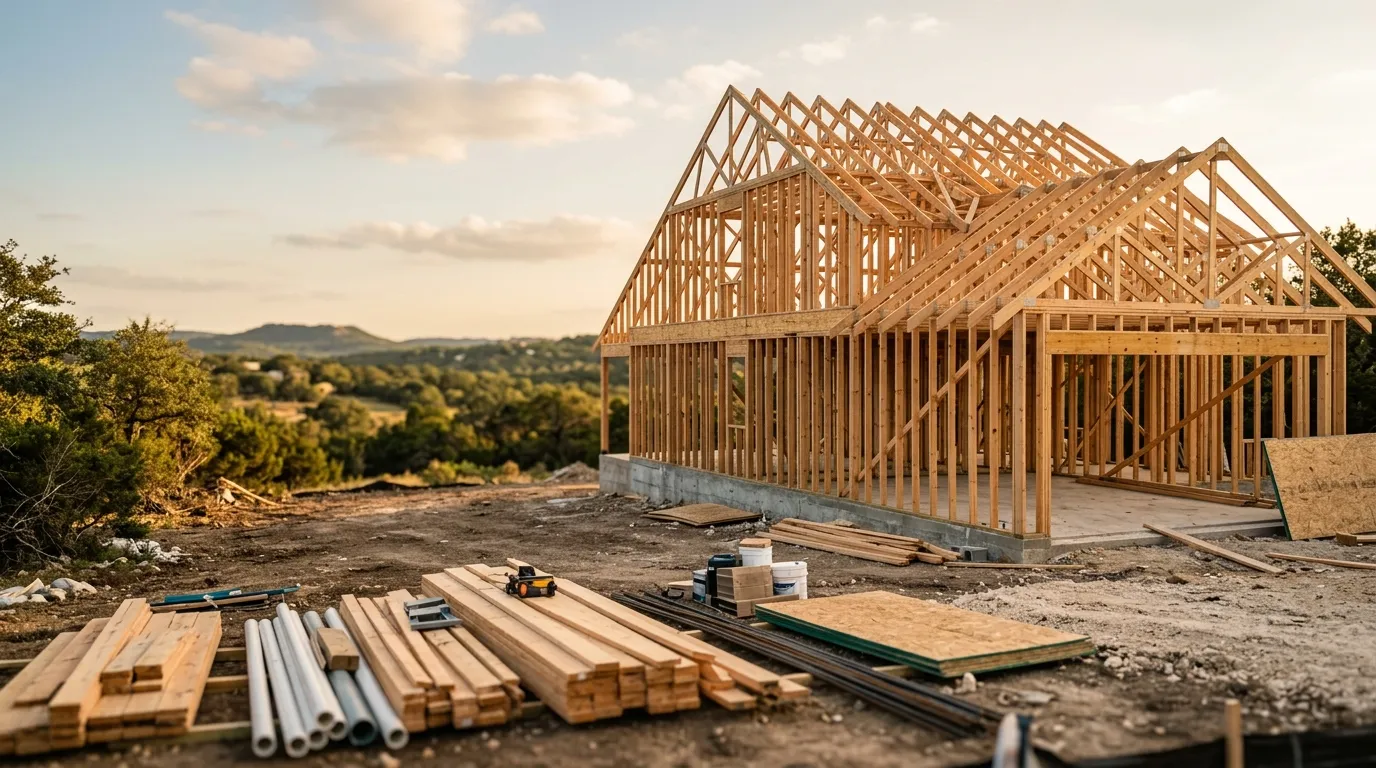
Step 3: Framing
Framing is when the house takes its most recognizable shape. Walls go up, floor systems are built, and the roof structure is installed.
Production builders in Austin typically work with lumber packages pre-cut to spec by a truss manufacturer. Wall panels and roof trusses arrive on pallets and are assembled by framing crews rather than being cut stick-by-stick on site. This reduces framing time to 2–4 weeks for most production homes, versus 6–10 weeks for a custom-framed home.
The framing sequence:
- First-floor walls and interior partitions
- Second-floor decking and wall framing (if two-story)
- Roof truss installation
- Sheathing applied to exterior walls and roof
- Windows and exterior doors rough-set
Austin summer note: Austin summers are brutal for framing crews — sustained 100°F+ heat slows productivity and requires adjusted scheduling. Builders commonly start framing crews at 6:00 AM and wrap early afternoon during peak summer. If your home is in framing during July or August, expect the schedule to stretch slightly compared to spring or fall starts.
After framing, the city sends an inspector to verify structural compliance before anything gets covered up.
Step 4: MEP Rough-In — HVAC, Electrical, and Plumbing
This is the phase that buyers most commonly skip when they visit the site, and it is the most important one to pay attention to.
MEP stands for Mechanical (HVAC), Electrical, and Plumbing. Rough-in is when all three systems are installed inside the framed structure — before insulation or drywall covers them.
HVAC: Ductwork runs are installed through floor joists and ceiling cavities. In Austin, the most common configuration is a split system with an air handler in the attic or a closet and a condenser unit outside. Air handler location matters — attic-mounted air handlers are standard in Austin but require an annual service visit to verify the condensate drain is clear, since a clogged drain in a humid Austin summer can cause significant ceiling damage.
Electrical: Wire runs are pulled from the panel location throughout the home — circuits for outlets, lighting, appliances, and any pre-wire you purchased as a structural option (data, audio, EV charger circuit). This is the last moment to add pre-wires at low cost. Once drywall is up, adding a new circuit run means cutting walls and patching.
Plumbing: Supply lines and drain lines are roughed in. First-floor plumbing is typically run under the slab (which was plumbed before the concrete pour), while second-floor plumbing runs through the framing.
After rough-in, each trade is inspected by the city: electrical rough-in inspection, plumbing rough-in inspection, and mechanical inspection. All three must pass before insulation and drywall can proceed.
This is when your pre-drywall inspection should happen. A professional inspector walks the rough-in phase before anything is covered — looking for missing fire blocking, improperly supported plumbing, wire runs too close to nails, HVAC duct connections that aren’t properly taped, and a dozen other issues that are invisible after drywall. Budget $400–$600. It is the single most valuable inspection you can do. See my full guide to new construction inspections for details on all three inspection stages.
Step 5: Interior Finishes
After insulation is blown in and drywall is hung and taped, the interior finish work begins. This is the longest phase in the construction timeline — typically 6–10 weeks depending on community volume — because of the number of trades and the sequential nature of the work.
The sequence:
- Drywall hang, tape, float, and texture — walls and ceilings get their finish coat
- Interior paint — primer and color coats throughout
- Trim carpentry — baseboards, door casings, window sills, crown molding if included
- Cabinetry installation — kitchen cabinets, bathroom vanities, built-ins
- Countertops — templated, fabricated, and installed (usually 2–3 weeks after cabinets)
- Tile work — kitchen backsplash, bathroom tile, shower surrounds
- Flooring — hardwood, LVP, tile, carpet in order of installation sequence
- Plumbing trim-out — fixtures, faucets, sinks, toilets
- Electrical trim-out — outlet covers, light fixtures, switches
- Appliances
Design center decisions you made during contract (cabinet color, countertop material, flooring type, tile selections) all materialize during this phase. If something arrives damaged or incorrect, a good superintendent will catch it before install — but buyers who do a mid-construction visit during this phase often catch things the super missed.
Austin-specific: Many production builders here use a level selection system (Level 1 through 5) for flooring, countertops, and tile. What you see in the model home is often Level 4 or 5. The base home — what you get for the contract price — is Level 1. The difference in appearance can be significant. Know your level before you finalize your design center selections.
Step 6: Exterior Finishes
While interior work is progressing, exterior finishing runs in parallel:
- Exterior sheathing and housewrap — applied during or just after framing to create a weather barrier
- Siding or stucco application — in Austin, most production homes use a combination of brick, stone veneer, and fiber cement siding; full stucco is more common in Hill Country and Hill Country adjacent builds
- Roofing — architectural shingles are standard; metal roofing is more common in Dripping Springs and Lakeway custom builds
- Windows and doors — final sealing and trim installed
- Driveway and walkways — poured concrete
- Grading and drainage — final grade established to direct water away from the foundation
- Landscaping — sod, trees, and plantings per the lot plan
Most production builders in Austin include a basic front-yard landscaping package; backyard landscaping beyond sod is usually an add-on or left to the buyer.
Finishing Touches and Pre-Closing
In the final 2–4 weeks before your scheduled closing date, the home goes through:
- Builder punch list inspection by the superintendent
- Quality control walk by the sales rep
- Certificate of Occupancy inspection by the city
- Final cleaning
- Your buyer’s final inspection — this is when you schedule a professional inspector to walk the completed home before closing. Another $400–$600. Every new home has findings: off-plumb trim, grout inconsistencies, HVAC settings, missing caulk, paint touch-ups. Document them all and submit to the builder for correction before you sign.
After your final inspection findings are addressed, you do a buyer walk-through with your sales rep — commonly called the “homeowner orientation” or “blue tape walk.” You mark items for repair with blue painter’s tape, the super creates a work order, and items are corrected before your closing date or added to a 30-day post-close correction list.
What Buyers Should Actually Do During Construction
Most buyers sign a contract and don’t see their home until the homeowner orientation. That is a mistake.
The visits that matter:
- Pre-drywall inspection — schedule a professional inspector before drywall covers the rough-in work
- Mid-construction walk during interior finishes — verify your selections were ordered correctly (wrong tile gets caught before it’s grouted)
- Final inspection before closing — professional inspection of the completed home
The 11th-month warranty inspection — just before your builder’s 1-year workmanship warranty expires — is the fourth inspection worth scheduling. Anything that has shifted, cracked, or failed in the first year gets documented and submitted under warranty.
For a deeper look at which builders are building in the Austin metro right now, what communities are open, and what incentives look like, see the new construction homes in Austin guide and the Austin new construction buyer’s guide blog post.
When you are ready to tour specific communities, reach out directly — I will walk you through the site and ask the questions that matter at each stage of construction.
Frequently Asked Questions About How New Construction Homes Are Built
How long does it take to build a new construction home in Austin? A built-to-order home typically takes 5–9 months from contract to closing. Spec homes already under construction can close in 30–60 days. Summer heat and material lead times push timelines toward the longer end.
Can I make changes after I sign my contract? Structural changes — adding a room, changing from a 2-car to 3-car garage, adding a bedroom — can only be made before construction starts, typically within a specific window after contract signing. Design center selections (flooring, countertops, cabinets, tile) have a later deadline but still close out before that phase of construction begins.
What happens if there is a foundation issue after closing? Production homes in Texas typically come with a 10-year structural warranty covering the foundation. Post-tension slab issues in Austin are uncommon but do occur — most often from improperly compacted fill or drainage problems that weren’t caught at inspection. Document any foundation cracks (diagonal cracks at corners are the most concerning) and report to the builder immediately.
Should I hire a buyer’s agent for new construction? Yes. The builder’s sales rep works for the builder. A buyer’s agent represents you — helps you compare floor plans, negotiate incentives, schedule inspections, and review the builder’s contract before you sign. Builder commissions are typically paid from the builder’s marketing budget, not from your purchase price. Register your agent before your first visit to any sales office. More on this in the Austin new construction guide.
Frequently Asked Questions
How long does it take to build a new construction home in Austin?
A built-to-order new construction home in Austin typically takes 5–9 months from contract signing to closing, depending on the builder, floor plan complexity, and materials. Spec homes already under construction can close in 30–60 days. Austin's summer heat and periodic material delays can push timelines to the longer end of that range.
What is a post-tension slab and why is it used in Austin?
A post-tension slab is a concrete foundation reinforced with steel cables that are tensioned after the concrete cures. Austin builders use post-tension slabs because Central Texas has expansive clay soil that swells when wet and shrinks when dry, which would crack a conventional slab. Post-tension slabs flex with soil movement rather than fracture.
What is the pre-drywall inspection and why does it matter?
The pre-drywall inspection happens after framing, plumbing, HVAC, and electrical rough-in are complete but before insulation and drywall cover everything. This is the most important inspection you can do on a new construction home — once the walls are closed, you cannot see framing mistakes, misrouted plumbing, or improperly run electrical without tearing out drywall. Cost is roughly $400–$600.
Can I visit my home during construction?
Yes — most Austin builders allow scheduled site visits with advance notice, usually with your sales rep or superintendent present. Walking the site at the pre-drywall stage is especially valuable, and most builders will accommodate it. Random drop-ins are typically not allowed for liability and safety reasons.
What are MEP rough-ins in new construction?
MEP stands for Mechanical (HVAC), Electrical, and Plumbing. Rough-in is the phase where these systems are installed inside the framed walls and ceilings before drywall covers them — ductwork runs, wire runs, pipe runs. Everything that gets buried behind finished walls happens at rough-in. It is inspected by the local municipality before insulation and drywall can proceed.
Have questions about Austin real estate?
Reach out — I'm happy to help with your home search or sale.